Savin 5450 User Manual
Browse online or download User Manual for Printers Savin 5450. Savin 5450 User Manual
- Page / 230
- Table of contents
- BOOKMARKS
- 3350DNP/5450 1
- Safety Information 3
- Warning: 4
- Caution: 5
- How To Read This Manual 7
- Making Prints 8
- GRPOSI0E 10
- GRTINT0E 10
- GRRATI0E 10
- GRAUTO0E 10
- GRZOOM0E 10
- GRDIRE0E 11
- GRERAS0E 11
- GRCLAS2E 11
- GRCLAS1E 12
- GRCLAS0E 12
- GRCOMB2E 12
- GRACOM0E 12
- GRJOBS0E 12
- Priority 13
- Preliminary 13
- Confidential 13
- TABLE OF CONTENTS 15
- 2.OPTIONAL FUNCTIONS 17
- 3.USER TOOLS 17
- 5.REMARKS 19
- 6.SPECIFICATIONS 19
- Machine Exterior 21
- Machine Interior 22
- 1. Document Feeder 24
- Operation Panel 26
- 617 202123 27
- 24221918 27
- Indicators 28
- Panel Display 29
- Display Panel Layout 30
- 1. OPERATION 31
- Important 32
- Original Print 34
- Preparation For Printing 35
- OPERATION 36
- D When you use A4, 8 37
- E Turn on the main switch 38
- User Codes 39
- Standard Printing 40
- Changing The Paper Size 43
- Delivery Trays 44
- Adjusting Print Image Density 46
- Tint Mode—Halftone Printing 47
- Changing The Printing Speed 48
- Enlarging Using Preset Ratios 50
- Metric version 52
- B Press the 53
- C Select 53
- TPES570E 55
- Using the number keys 56
- D Select 57
- Entering The Dimensions Of 58
- The Original And Print Paper 58
- F Press the 61
- H Make your prints 61
- Printing On Thick Paper 62
- Printing On Thin Paper 62
- Printing On Envelopes 63
- Printing On Special Kinds Of 63
- Letter/Photo Mode Printing 66
- Pencil Mode Printing 67
- Economy Mode—Saving Ink 68
- One Stroke 69
- Using All Stored Data 71
- G Make your prints 72
- Using Stored Data 73
- I Make your prints 75
- The Same Original 76
- D Enter the desired number of 78
- Prints From The same Original 81
- Into One Print 83
- Inch version 85
- E Select 86
- K Make your prints 87
- Repeated On One Print 88
- Skip Feed Printing 90
- Storing Your Settings 92
- Recalling A Program 93
- Protecting A Program 93
- Removing Program Protection 94
- Documents 95
- On The Paper Delivery Tray 97
- B Make your prints 98
- Saving Master 99
- On Line Printing 100
- 2. OPTIONAL FUNCTIONS 101
- Document Feeder 102
- Setting Originals In The 102
- D Make your prints 103
- D Press the 103
- Manual Class Mode With 2 Or 104
- More Originals Using The 104
- Clear/Stop 105
- M Press the 106
- Making Color Prints 107
- Changing The Color Drum Unit 107
- I Close the front door 108
- Changing The Drum Size 110
- OPTIONAL FUNCTIONS 112
- Make-up Printing Features 113
- Background Patterns 116
- Printing 118
- How To Make A Command Sheet 119
- GRCOMM1E 121
- GRCOMM3E 123
- GRCOMM4E 123
- Make-up Printing 125
- N Press the 129
- P Press the 129
- Make-up Samples 130
- 1. Original 131
- 2. Command sheet No.1 131
- 3. Command sheet No.2 131
- 4. Print 131
- BIRTHDAY 132
- Image Overlay—Merging Images 133
- Stamped On Your Prints 135
- B Select the 138
- C Press the 138
- E Press the 138
- G Press the 139
- H Select the 139
- Messages On Your Prints 140
- TPES530E 141
- TPES580E 141
- TPEH270E 141
- TPEH281E 141
- Limitation 144
- A Press the 147
- B Select 147
- F Set your originals 148
- Reference 151
- H Press the 152
- 3. USER TOOLS 153
- User Tools Menu 155
- 2. Set Operation Modes 156
- 3. Initial Setting 157
- USER TOOLS 158
- 4. Mode Setting 159
- 5. Stamp 164
- 6. Set User Code (s) 166
- User Tool Menus In Detail 168
- 3-5 Class Enter No 169
- 3-9 Margin Erase Area 170
- 4-11 No. of Skip Feed 171
- 4-19 Type of Paper 174
- 5-4 Stamp Position 174
- I Press the 176
- J Press the 176
- 5-8 Regist. (User) 178
- 5-11 Position (Date) 178
- 5-14 Position (Page) 180
- 5-15 Make/Chg. Pattern 181
- 6-1 Check Counter 182
- 6-2 Reset Counters 183
- 6-4 Chg. User Code 183
- 6-5 Del. User Code 184
- 4. What To Do If Something 185
- Goes Wrong 185
- Combine Originals Mode 187
- Clearing Misfeeds 188
- A Open the front door 189
- C Take out the drum 189
- TPEY090E 192
- To prevent original misfeeds: 196
- ) Lights 197
- When The Add Ink Indicator ( 198
- G Close the front door 199
- H Close the master guide 201
- When Other Indicators Are Lit 203
- Neat Stack 204
- Poor Printing 205
- B Pull out the drum unit 206
- F Close the front door 207
- G Turn on the main switch 207
- Black Line/Stain 208
- Skipped Prints 208
- 5. REMARKS 209
- Print Paper 211
- Originals 211
- Misfed Paper 211
- PC Controller 212
- Where To Put Your Machine 213
- Power connection 214
- Access to machine 214
- 1. More than 10 cm, 4.0" 215
- Maintaining Your Machine 216
- A Lift the document feeder 217
- Combination Chart 218
- Function specified earlier 219
- 6. SPECIFICATIONS 221
- SPECIFICATIONS 222
- Main Frame 223
- Printing Speed 224
- 60 rpm 71 dB 224
- 90 rpm 74 dB 224
- 120 rpm 77 dB 224
- Consumables 226
Summary of Contents
3350DNP/5450OPERATING INSTRUCTIONSTPEH162NRead this manual carefully before you use this product and keep it handy for futurereference.For safety, ple
viiiWhat You Can Do With This Machine❖❖❖❖Standard PrintingSee ⇒ P.20 “Standard Printing”.❖❖❖❖Adjusting Print Image PositionSee ⇒ P.25 “Adjusting Print
OPERATION801On Line PrintingThe images on a personal computercan be printed using this machine.Limitation❒The PC controller is required. Fordetails, r
812. OPTIONAL FUNCTIONSPrinting Using The Optional Document FeederInsert a stack of originals in the docu-ment feeder. It will be fed automati-cally.O
OPTIONAL FUNCTIONS822Basically, set originals as shown be-low.When you have an optional memoryboard and the original is set in a dif-ferent direction
Printing Using The Optional Document Feeder832D Make your prints.Note❒If the next original has been setin the document feeder beforethe machine stops,
OPTIONAL FUNCTIONS842E Select [Combine 2] or [Quadruple]with the [←←←←], [→→→→], {{{{~~~~}}}}, or {{{{}}}}}}}}key.F Press the [OK] key.G Press the {{{
Printing Using The Optional Document Feeder852E Press the {{{{Enter}}}} key.F Enter the desired number ofprints for the second originalwith the Number
OPTIONAL FUNCTIONS862M Press the {{{{Print}}}} key.Program Clear ModesAuto CycleProofPrintEnterStartClear/StopTPES070N
Color Printing Using The Optional Color Drum872Color Printing Using The Optional Color DrumColor drum units (red, blue, green,and brown) are available
OPTIONAL FUNCTIONS882out the drum unit while holdinghandle B2 and drum stay B3.Important❒Be careful not to let the drumunit fall.E Lower lock lever B1
Color Printing Using The Optional Color Drum892A Prepare the two originals. Set thefirst original on the exposureglass (contact glass).B Enter the num
ix❖❖❖❖Stretching And Squeezing The ImageIn 1 % StepsSee ⇒ P.37 “Directional Magnifica-tion—Stretching And Squeezing TheImage In 1 % Steps”.❖❖❖❖Erasing
OPTIONAL FUNCTIONS902Changing The Drum SizeTo save costs on master rolls and ink,you can shorten the length of eachmaster by changing to an optionalsm
Image Rotation—Rotating Original Images912Image Rotation—Rotating Original ImagesWhen the direction in which your original is set is different from th
OPTIONAL FUNCTIONS922❒It takes longer than usual to make masters in Image Rotation mode.❒You can cancel Image Rotation mode with the user tools. See “
Make-up Printing Features932Make-up Printing FeaturesMake-up mode enables you to do more than just make an exact copy of the orig-inal. A variety of e
OPTIONAL FUNCTIONS942Make-up Modes For Outside Designated Areas5. P./N. mode (Positive Negative mode)6. Solid mode (Image Pat-tern mode)7. All Page Pa
Make-up Printing Features952Note❒In Make-up mode, commands must be given for both designated areas andoutside the designated area.3. Save Area mode: T
OPTIONAL FUNCTIONS962Background PatternsThere is a total of 164 background patterns for Make-up mode:• 40 basic patterns• 40 patterns similar to the b
Make-up Printing Features972Note❒The basic patterns are numbered 1 to 40.❒You can make your own make-up background patterns with the user tools.See ⇒
OPTIONAL FUNCTIONS982Making A Command Sheet For Make-Up PrintingCommand sheets are fed first so thatthe machine can recognize the areasof the original
Making A Command Sheet For Make-Up Printing992How To Make A Command SheetThere are two ways of designating areas: the diagonal line method and theclos
x❖❖❖❖Making Variable Numbers Of PrintsFrom Different OriginalsSee ⇒ P.58 “Manual Class ModeWith 2 Or More Originals—MakingVariable Numbers Of Prints F
OPTIONAL FUNCTIONS1002----Notes about drawing a command sheetThe image might differ depending on how the designated area is drawn, so re-member the fo
Making A Command Sheet For Make-Up Printing1012When using the diagonal line methodNote❒A diagonal line must be drawn through the area that you wish to
OPTIONAL FUNCTIONS1022a, b, c = 2 mm, 0.08"When using the closed area methodNote❒The line designating the area must be a closed loop.A Put the co
Making A Command Sheet For Make-Up Printing1032a = Line marking the designated areab = 2 mm, 0.08"c = Image within the designated area❒The line m
OPTIONAL FUNCTIONS1042Command Sheets And Finished PrintsThe following illustrations will help you understand how to draw a commandsheet.❖❖❖❖When drawi
Make-up Printing1052Make-up PrintingA Press the {{{{Make-Up}}}} key.B Make sure that [1] is selected.Then press the [OK] key.C Select the frame shape
OPTIONAL FUNCTIONS1062❒To change the value entered,press the {Clear/Stop} key andenter the new value.J After you have finished designat-ing modes for
Make-up Printing With The Optional Document Feeder1072Make-up Printing With The Optional Document FeederUnder the following conditions, youshould set
OPTIONAL FUNCTIONS1082E Select the mode for the first com-mand sheet with the [←←←←], [→→→→],{~}, {{{{}}}}}}}}, {{{{||||}}}}, or {{{{{{{{}}}} key.F Pr
Make-up Printing With The Optional Document Feeder1092density with the [←←←←], [→→→→], {{{{~~~~}}}}, or{{{{}}}}}}}} key.Note❒Four coarseness settings
xi❖❖❖❖On Line PrintingSee ⇒ P.80 “On Line Printing”.❖❖❖❖Making Color PrintsSee ⇒ P.87 “Making Color Prints”.❖❖❖❖Printing In Two ColorsSee ⇒ P.88 “Prin
OPTIONAL FUNCTIONS1102Make-up Samples----Sample 1A Command Sheet No. 1, Frame shape , Designated area: Delete Area modeB Outside area: Letter modeC P
Make-up Samples1112----Sample 2A Command Sheet No. 1, Frame shape/, Designated area: All + Outline No. 30B Command Sheet No. 2 Frame shape , Designat
OPTIONAL FUNCTIONS1122----Sample 3A Print the original as it isB Change the drum unit for color printingC Command Sheet No. 1, Frame shape , Designat
Image Overlay—Merging Images1132Image Overlay—Merging ImagesThe machine can merge two differentoriginals onto the same print paper.Two types of mergin
OPTIONAL FUNCTIONS1142Setting originals on the exposure glass (contact glass)A Set the first original on the ex-posure glass (contact glass).B Press t
Stamping Date—Having The Date Stamped On Your Prints1152Stamping Date—Having The Date Stamped On Your PrintsYou can print the date on your prints.Prep
OPTIONAL FUNCTIONS1162B Make sure that [Date] is selected.C Press the [OK] key.D Select the desired Stamping Dateposition and direction with the[←←←←]
Page Stamping—Having Page Numbers Stamped On Your Prints1172Page Stamping—Having Page Numbers Stamped On Your PrintsYou can print page numbers on your
OPTIONAL FUNCTIONS1182B Select the [Page] with the [→→→→] or{{{{}}}}}}}} key.C Press the [OK] key.D Select the desired format with the[←←←←], [→→→→],
Page Stamping—Having Page Numbers Stamped On Your Prints1192F Select the desired orientationwith the [←←←←], [→→→→], {{{{~~~~}}}}, or {{{{}}}}}}}}key.
xii❖❖❖❖Printing Your Own Messages On YourPrintsSee ⇒ P.122 “User Stamping—Printing Your Own Messages OnYour Prints”.❖❖❖❖Combining Originals Into One P
OPTIONAL FUNCTIONS1202Stamping Function—Printing Preset Messages On Your PrintsOne of the following 3 messages canbe stamped on prints.ConfidentialPri
Stamping Function—Printing Preset Messages On Your Prints1212F Select the page to be stampedwith the [←←←←], [→→→→], {{{{~~~~}}}}, or {{{{}}}}}}}}key.
OPTIONAL FUNCTIONS1222User Stamping—Printing Your Own Messages On Your PrintsUp to 4 messages which you use fre-quently can be stored in the machineme
User Stamping—Printing Your Own Messages On Your Prints1232F Select the page to be stampedwith the [←←←←], [→→→→], {{{{~~~~}}}}, or {{{{}}}}}}}}key.G
OPTIONAL FUNCTIONS1242Memory Combine—Combining Originals Into One Print With The Memory BoardYou can combine originals in four ways:❖❖❖❖4 One-sided Or
Memory Combine—Combining Originals Into One Print With The Memory Board1252Combine 4, 8, or 16 Originals – 4, 8, or 16 One-sided Originals →→→→ 1 One-
OPTIONAL FUNCTIONS1262❒If the calculated ratio is under the minimum ratio, it is corrected within therange of the ratio automatically. However, with s
Memory Combine—Combining Originals Into One Print With The Memory Board1272❖❖❖❖When you set originals on the exposure glass (contact glass) (Metric ve
OPTIONAL FUNCTIONS1282C Press the [OK] key.D Select one of the desired combine modes.E Press the [OK] key.F Set your originals.Setting your original (
Memory Combine—Combining Originals Into One Print With The Memory Board1292Note❒Even if the number of originals is less than the number required in th
xiiiTABLE OF CONTENTSMachine Exterior... 1Machine Interior...
OPTIONAL FUNCTIONS1302❒The original and paper setting direction and the number of repeated imagesare as follows:❖❖❖❖For example, when you use A4 LLLL
Memory Combine—Combining Originals Into One Print With The Memory Board1312A Press the {{{{Combine}}}} key.B Select [Memory Combine] with the [←←←←] o
OPTIONAL FUNCTIONS1322Setting your original (K) on the exposure glass (contact glass)A Set your original as shown in the illustration.Setting your ori
1333. USER TOOLSAccessing The User ToolsThis section is for the key operators incharge of this machine. You canchange or set the machine's defaul
USER TOOLS1343pressing the [OK] key. Then en-ter the new value.❒[Cancel]: Press to return to theprevious menu without chang-ing any data.D Press the {
User Tools Menu1353User Tools MenuReferenceFor how to access the user tools, see ⇒ P.133 “Accessing The User Tools”.1. SystemNo. Mode Description1 Aut
USER TOOLS13632. Set Operation Modes8 Time Setting Use to set the machine's internal clock.Note❒The clock must be adjusted if you change the cloc
User Tools Menu13733. Initial Setting3 Copy Count DisplayThe counter can be set to show the number of prints made (Up), or the number of prints remain
USER TOOLS13834 Reproduction RatioAdjust a fixed reproduction ratio between 50 and 200 %.Note❒Default: • Metric version: 71 %, 82 %, 87 %, 93 %, 100 %
User Tools Menu13934. Mode Setting9 Margin Erase AreaAdjust the erase edges margin.Note❒Default: 2 mm, 0.1"ReferenceFor how to adjust the erase e
xivEntering The Dimensions Of The Original And Print Paper... 38Edge Erase—Erasing Edge Margins...
USER TOOLS14036 Background ON/OFFWhen you make prints in Photo, Letter/Photo, or Tint mode, the background of the prints might become dirty. Turn Back
User Tools Menu141310 Cancel Comb. Specifies whether Combine Originals or Memory Combine mode is cleared after finishing your print job.Note❒Default:
USER TOOLS142315 Deflector Angle You can change the angle of the wing guide depending on the paper type you use.Note❒Default: Auto❒Available settings:
User Tools Menu143318 Ink/Master LeftSpecifies whether you can check the amount of ink and master.Note❒Default: OFF❒Available settings:• OFF (You cann
USER TOOLS14435. StampNote❒You can use these functions only when you have an optional memory board.No. Mode Description1 Type You can change the messa
User Tools Menu14536 Density (User) You can select the style of the user stamps.Note❒Default: Solid-fill7 Position (User) You can edit the preset user
USER TOOLS14636. Set User Code (s)13 Direction (Page)You can select the page numbering direction at power on in Page Stamping mode.Note❒Default:• When
User Tools Menu14732 Reset Counters You can clear each or all user codes' counters.Note❒Default: SingleReferenceFor how to clear the number of ma
USER TOOLS1483User Tool Menus In Detail1-8 Time SettingA Press the {{{{User Tools}}}} key.B Make sure that 1 is selected. Thenpress the [OK] key.C Ent
User Tool Menus In Detail1493C Enter 4 with the Number keys.Then press the [OK] or {{{{Enter}}}} key.D Select the ratio you want to adjustwith the [←←
xv2.OPTIONAL FUNCTIONSPrinting Using The Optional Document Feeder... 81Originals...
USER TOOLS1503G Enter the number of studentswith the Number keys. Thenpress the {{{{Enter}}}} key.Note❒Repeat steps F and G until youhave finished reg
User Tool Menus In Detail1513Note❒You can also enter the ratiowith the Number keys andthe {Enter} key.If you selected *A Enter the erase edge marginwi
USER TOOLS15234-14 No. of Q.startNote❒The default settings are as follows:A Press the {{{{User Tools}}}} key.B Enter 4 with the Number keys. Then pres
User Tool Menus In Detail1533D Select the temperature at which you use this machine with the [←←←←], [→→→→],{~}, or {{{{}}}}}}}} key.E Press the [OK]
USER TOOLS15434-19 Type of PaperA Press the {{{{User Tools}}}} key.B Enter 4 with the Number keys.Then press the [OK] or {{{{Enter}}}} key.C Enter 19
User Tool Menus In Detail1553A Press the {{{{User Tools}}}} key.B Enter 5 with the Number keys.Then press the [OK] or {{{{Enter}}}} key.C Enter 4 with
USER TOOLS1563F Adjust the horizontal stamp posi-tion with the Number keys.G Press the {{{{Enter}}}} key.H Adjust the vertical stamp positionwith the
User Tool Menus In Detail1573A Press the {{{{User Tools}}}} key.B Enter 5 with the Number keys.Then press the [OK] or {{{{Enter}}}} key.C Enter 7 with
USER TOOLS15835-8 Regist. (User)A Press the {{{{User Tools}}}} key.B Enter 5 with the Number keys.Then press the [OK] or {{{{Enter}}}} key.C Enter 8 w
User Tool Menus In Detail1593A Press the {{{{User Tools}}}} key.B Enter 5 with the Number keys.Then press the [OK] or {{{{Enter}}}} key.C Enter 11 wit
xvi2. Set Operation Modes... 1363. Initial Setting...
USER TOOLS1603G Press the {{{{Enter}}}} key.H Adjust the vertical date stampingposition with the Number keys.I Press the {{{{Enter}}}} key.J Press the
User Tool Menus In Detail1613D Select the page numbering direc-tion you want to adjust with the[←←←←], [→→→→], {{{{~~~~}}}}, or {{{{}}}}}}}} key.E Pre
USER TOOLS1623F Move the cursor to the positionyou wish to edit with the {{{{~~~~}}}},{}}, {{{{||||}}}}, or {{{{{{{{}}}} key.G Press the {{{{Enter}}}}
User Tool Menus In Detail16336-2 Reset CountersA Press the {{{{User Tools}}}} key.B Enter 6 with the Number keys.Then press the [OK] or {{{{Enter}}}}
USER TOOLS1643D Keep pressing the [→→→→] or {{{{}}}}}}}} keyto display your user code.E Press the [OK] key.F Enter the new user code with theNumber ke
1654. What To Do If SomethingGoes WrongIf Your Machine Does Not Operate As You WantIf a malfunction or a misfeed occurs within the machine, the follow
What To Do If Something Goes Wrong1664----When a service call message is displayed in the panel displayPress the [Exit] key. Then turn the main switch
If You Cannot Make Prints As You Want1674If You Cannot Make Prints As You WantCombine Originals ModeProblem Cause ActionMisfeeds occur frequently. Imp
What To Do If Something Goes Wrong1684x Clearing MisfeedsR CAUTION:Note❒After clearing the misfeeds, makesure that all the doors, covers, andunits are
x Clearing Misfeeds1694• When paper edges stick togetheror paper is not fed to the machine,shuffle the paper as shown.• When you use postcards or thic
xviiPoor Printing... 185Dirty Background...
What To Do If Something Goes Wrong1704F Set the drum unit and close thefront door.----To prevent paper misfeeds:See ⇒ P.168 “”x + A” Paper Misfeed InT
x Clearing Misfeeds1714C Take out the drum.Note❒For how to take out the drumunit, see ⇒ P.87 “Changing TheColor Drum Unit”.D Remove the misfed paper f
What To Do If Something Goes Wrong1724----To prevent paper misfeeds:If the paper is curled or the original'sleading edge margin is too narrow,the
x Clearing Misfeeds1734”xxxx + D” Master Misfeed In The Master Feed SectionA Pull out the master feed unit untilit stops.B Open the master guide.C Ope
What To Do If Something Goes Wrong1744C Take out the drum.D Pull out the misfed master fromthe inside.E Set the drum unit and close thefront door.”xxx
x Clearing Misfeeds1754G Pull out lever E3 and remove themisfed master.H Return lever E3 and the mastereject unit to their original posi-tion.I Set th
What To Do If Something Goes Wrong1764D Pull the green knob towards youand remove the misfed original.E Return the document feed sheetto its original
When The Open Cover/Unit Indicator (M) Lights1774When The Open Cover/Unit Indicator (M) LightsMMake sure that the following door/cover are closed.❖❖❖❖
What To Do If Something Goes Wrong1784When The Add Ink Indicator (j) LightsThe Add Ink indicator (j) lights when it is time to supply ink.R CAUTION:R
When The Add Ink Indicator (j) Lights1794C Remove the used ink cartridge.D Remove the cap of the new ink cartridge.E Insert the new cartridge into the
Note to users in the United States of AmericaNotice:This equipment has been tested and found to comply with the limits for a Class A digital devices,
xviiiThis page is intentionally blank.
What To Do If Something Goes Wrong1804When The Master End Indicator (C) LightsThe Master End indicator (C) lights when it is time to replace the maste
When The Master End Indicator (C) Lights1814G Insert the paper edge of the master roll as shown in the illustration until themaster edge reaches the a
What To Do If Something Goes Wrong1824When The Master Eject Indicator (k) LightsThe Master Eject indicator (k) lightswhen it is time to empty the mast
When Other Indicators Are Lit1834When Other Indicators Are LitIndicator Meaning and actionThe key counter (option) is not set. Insert the key counter.
What To Do If Something Goes Wrong1844When The Prints Are Not Delivered In A Neat StackIf you use small size paper, printsmight not be delivered in a
Poor Printing1854Poor PrintingDirty BackgroundIf the background of prints is dirty, the drum unit is dirty.R CAUTION:R CAUTION:R CAUTION:Note❒When you
What To Do If Something Goes Wrong1864B Pull out the drum unit.Note❒For how to take out the drum unit, see ⇒ P.87 “Changing The Color DrumUnit”.C Whil
Poor Printing1874E Insert the drum unit until it locks in position, then lower the drum unitlock lever.F Close the front door.G Turn on the main switc
What To Do If Something Goes Wrong1884Black Line/StainCheck the platen cover and clean it ifdirty. See ⇒ P.196 “Platen Cover”.Check the exposure glass
1895. REMARKSOperation NotesGeneral Cautions• While printing, do not turn off the main switch.• While printing, do not open the door or covers.• While
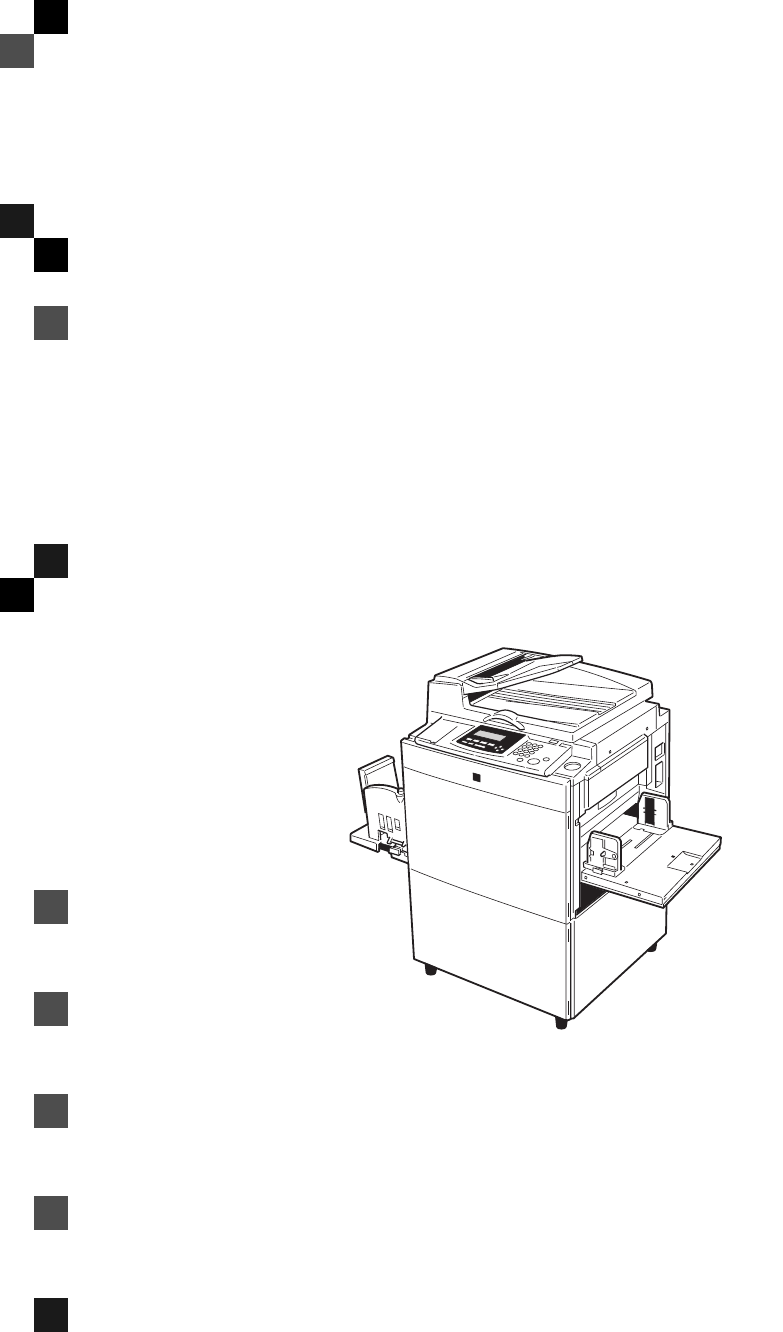
1Machine Exterior1. Front DoorOpen for access to the inside of the ma-chine.2. Flip-up CoverOpen to access the {Image Density} keyand so on. See ⇒ P.6
REMARKS1905• When making duplex prints or when using non-white printing paper, the pa-per end sensor might malfunction and fail to detect the paper. I
Operation Notes1915• When you use originals with light lettering, edges of the letters might beprinted clearly and the inside of the letters might be
REMARKS1925PC ControllerImportant❒Make sure that m indicator on the PC controller operation panel is off beforeunplugging the power cord.
Where To Put Your Machine1935Where To Put Your MachineYour machine's location should be carefully chosen because environmental con-ditions greatl
REMARKS1945• Locations directly exposed to cool air from an air conditioner or heated airfrom a heater. (Sudden temperature changes might cause conden
Where To Put Your Machine1955❖❖❖❖Main Frame1. More than 10 cm, 4.0"2. More than 60 cm, 23.7"3. More than 60 cm, 23.7"4. More than 60 cm
REMARKS1965Maintaining Your MachineTo maintain high print quality, cleanthe following parts and units regular-ly.Important❒Do not use benzine, thinner
Maintaining Your Machine1975Optional Document FeederSheetA Lift the document feeder.B Clean the sheet with a damp clothand wipe it with a dry cloth.No
REMARKS1985Combination ChartThis combination chart shows which modes can be used together.✩means that these modes can be used together.-- means that t
Combination Chart1995Function specified earlierMemory Combine mode (4 Originals)✩✩✩✩✩✩✩✩*1 *1 -- *1 *1✩✩✩✩✩✩*2 *2 *2 *2 *2 *2 *1 *2✩*1Memory Combine m
2Machine Interior1. Main SwitchUse to turn the power on or off.2. Paper Alignment Wing KnobsUse to lift or lower the paper alignmentwings.3. Paper Ali
REMARKS2005This page is intentionally blank.
2016. SPECIFICATIONSMain Frame❖❖❖❖Configuration:Desk top❖❖❖❖Printing Process:Full automatic one drum system❖❖❖❖Original Type:Sheet/Book❖❖❖❖Original Si
SPECIFICATIONS2026From 50 % to 200 % in 1 % steps❖❖❖❖Printing Area:• A3 drum:• Inch version: More than 290 × 419 mm, 11.4" × 16.4"• Metric v
Main Frame2036❖❖❖❖Master Eject Unit Capacity:•A3 drumMore than 60 masters•A4 drum90 masters❖❖❖❖Dimensions (W ×××× D ×××× H):❖❖❖❖Weight:• Machine:Less
SPECIFICATIONS2046❖❖❖❖Noise Emission:Sound power level: The measurements are made according to ISO 7779.❖❖❖❖Power Source:See the inside front cover of
Document Feeder2056Document Feeder❖❖❖❖Original Type:Sheet❖❖❖❖Original Weight:40.7 g/m2 to 127.9 g/m2, 10.8 lb to 34 lb❖❖❖❖Original Size:Max. 297 mm ×
SPECIFICATIONS2066ConsumablesNote❒Specifications are subject to change without notice.Name Size RemarksMaster: Length: 110 m, 410 ft/rollWidth: 420 mm
207INDEX16 One-sided Originals → 1 One-sided Print Of 16 Images, 1241 One-sided Originals → 1 One-sided Print Of 2 Images, 681 One-sided Originals
208EEconomy Mode, 48{Economy Mode} key, 6Edge Erase, 40{Edge Erase} key, 6{Enter} key, 7Envelopes, 43Environmental Conditions, 193Erasin
209Monitors, 8MSTR Makg. Density, 137NNext, 9No. of Q.start, 141, 152No. of Skip Feed, 141, 151No Orig. Size, 139No Orig. Size (ADF), 13
37. Paper Delivery Side PlatesThese plates align the prints on the paperdelivery tray.8. Paper Delivery Side Plate KnobsUse to move the side plates.9.
210SSafety Information, iSaving Ink, 48Saving Master, 79{Security} key, 6Security Mode, 75Select, 9Separating Printing Sets, 77service c
4Options1. Document FeederNote❒Other options:• Color Drums: A3, 11" × 17" drum (red, blue, green, and brown)• Color Drums: A4, 81/2" ×
5This page is intentionally blank.
6Operation PanelKeys1.{{{{Quality Start}}}} key See ⇒ P.76 “Quality Start Mode— Regain-ing The Image Density When The Ink On TheDrum Dries”.2.{{{{Secu
715.{{{{Class}}}} keyPress to select All Class, Auto Class,Manual Class, or Class mode. See ⇒ P.51“All Class Mode—Making Variable Num-bers Of Prints F
8Indicators1. Special Feature indicatorThis indicator is lit when you press keysunder the flip-up cover.2. MonitorsThe monitors light up when a non-st
9Panel DisplayThe panel display shows operational status, error messages, and functionmenus.1. The function items for the select-ed function are displ
iSafety InformationWhen using your machine, the following safety precautions should always befollowed.Safety During OperationIn this manual, the follo
10Display Panel LayoutThe basic elements used on the display are shown below. Understanding theirmeaning helps you exploit this machine's feature
111. OPERATIONPrinting PaperThe following types of print paper are not recommended for this machine.• Paper smaller than 70 mm × 148 mm, 2.8" × 5
OPERATION121Important❒Correct curls in the paper before setting it in the machine. When you cannotcorrect the paper curl, stack the paper with the cur
Originals131OriginalsThe following original sizes set on the exposure glass (contact glass) can be de-tected.Under the following conditions, the machi
OPERATION141The first 10 mm, 0.4", of the leading edge and the last 2 mm, 0.08”, of the trailingedge cannot be printed. Make sure the leading edg
Preparation For Printing151Preparation For PrintingLoading PaperA Carefully open the paper feedtray.B Lift the feed side/end plates.C Grasp the side/e
OPERATION161Setting Up The Paper Delivery TrayA Grasp the end plate knob andmove the paper delivery end plateto match the print paper size.When you us
Preparation For Printing171C Lower or lift the paper alignmentwings by turning the left andright knobs.Note❒When the guides are up, youmight not be ab
OPERATION181E Turn on the main switch.Note❒You can have the machine dis-play how much ink and masterare left when you switch it on.See “User Tools—Ink
User Codes191User CodesPreparationYou have to turn on User Codemode and register your user codewith the user tools. You can regis-ter up to 20 user co
iiRRRRWarning: •Only connect the machine to the power source described onthe inside front cover of this manual.•Avoid multi-wiring.•Do not damage, bre
OPERATION201Standard PrintingA Lift the platen cover.Note❒Be sure to lift the platen covermore than 30 cm, 12".B Set the original face down on th
Standard Printing211G Press the {{{{Proof}}}} key and checkthe image density and the imageposition of the proof print.Note❒If the image position is no
OPERATION221Loading Paper On The Paper Feed TrayThe Load Paper indicator (B) lightswhen the paper feed tray runs out ofpaper.Replenishing PaperA Press
Loading Paper On The Paper Feed Tray231Changing The Paper SizeA Remove the paper from the paperfeed tray.The paper feed tray will lower.B Grasp the si
OPERATION241Closing The Paper Feed And Paper Delivery TraysA Remove the paper from the paperfeed tray.The paper feed tray will lower.B Turn off the ma
Adjusting Print Image Position251Adjusting Print Image PositionYou can adjust the print image posi-tion to suit your needs.*…Paper feed directionA Pre
OPERATION261Adjusting Print Image DensityYou can adjust the print image densi-ty to suit your needs. There are twoways to do this:❖❖❖❖Before Making A
Tint Mode—Halftone Printing271Tint Mode—Halftone PrintingUse this function to print tinted imag-es.A Press the {{{{Tint}}}} key.B Press the {{{{Start}
OPERATION281Changing The Printing SpeedUse the {Speed} keys to adjust theprinting speed. The relationship be-tween printing speed and print quali-ty d
Stopping The Machine During A Multi-print Run291Stopping The Machine During A Multi-print RunWhen You Want To Stop The Machine During A Multi-print Ru
iiiRRRRCaution: •Keep the machine away from humidity and dust. A fire or an elec-tric shock might occur.•Do not place the machine on an unstable or ti
OPERATION301Preset Reduce/Enlarge—Reducing And Enlarging Using Preset RatiosYou can select a preset ratio for print-ing.Note❒The leading edge of the p
Preset Reduce/Enlarge—Reducing And Enlarging Using Preset Ratios311A Press the [Ratio] key.B Select the desired ratio with the[←←←←], [→→→→], {{{{~~~~
OPERATION321Auto Magnification Selection—Having The Machine Choose The Reproduction RatiosThe machine can choose an appropriate reproduction ratio bas
Auto Magnification Selection—Having The Machine Choose The Reproduction Ratios331*2Set these originals in the optional document feeder.❖❖❖❖Inch versio
OPERATION341E Press the {{{{Start}}}} key.F Check the image position of the trial or proof print.Note❒If the image position is not correct, adjust it
Zoom—Reducing And Enlarging In 1 % Steps351Zoom—Reducing And Enlarging In 1 % StepsYou can change the reproduction ra-tio in 1 % steps.Note❒You can ch
OPERATION361Using the number keysA Enter the ratio with the Num-ber keys.B Press the {{{{Enter}}}} key.G Press the [OK] key.H Make sure that the origi
Directional Magnification—Stretching And Squeezing The Image In 1 % Steps371Directional Magnification—Stretching And Squeezing The Image In 1 % StepsP
OPERATION381F Enter the vertical and horizontalratio.Note❒To change the value entered,press the {Clear/Stop} key andenter the new value.Adjusting rati
Directional Magnification—Stretching And Squeezing The Image In 1 % Steps391C Press the [OK] key.D Select [Direct. Mag. (size)] with the[→→→→] or {{{{
iv•Keep the ink or ink container out of reach of children.•If ink is ingested, force vomiting by drinking a strong saline solu-tion and consult a doct
OPERATION401Edge Erase—Erasing Edge MarginsThis function erases all four sides ofthe original image.❖❖❖❖Using Edge Erase mode❖❖❖❖When not using Edge E
Edge Erase—Erasing Edge Margins411F Press the {{{{Start}}}} key.G Check the image position of thetrial or proof print.Note❒If the image position is no
OPERATION421Printing On Various Kinds Of PaperPrinting On Thick PaperWhen you make prints on thick (157to 209.3 g/m2, 42 to 55.6 lb) paper,perform the
Printing On Various Kinds Of Paper431Note❒If necessary, lower or lift the pa-per alignment wings. See ⇒P.15 “Preparation For Printing”.E Set the side
OPERATION441A Press the [Ppr. Type] key.B Select [User 1] or [User 2] with the[←←←←], [→→→→], {{{{~~~~}}}}, or {{{{}}}}}}}} key.C Press the [OK] key.-
Selecting A Mode To Match Your Original451Selecting A Mode To Match Your OriginalSelect one of the following fourmodes to match your originals:❖❖❖❖Pho
OPERATION461F Adjust the lightness with the [←←←←],[→→→→], {{{{~~~~}}}}, or {{{{}}}}}}}} key.G Press the [OK] key.H Set your original on the exposureg
Selecting A Mode To Match Your Original471G Press the {{{{Start}}}} key.H Check the image position of thetrial or proof print.Note❒If the image positi
OPERATION481Economy Mode—Saving InkWhen you want to save ink, selectEconomy mode.Note❒Prints will be lighter in this mode.A Press the {{{{Economy Mode
Auto Cycle—Making Master And Prints At One Stroke491Auto Cycle—Making Master And Prints At One StrokeUse the {Auto Cycle} key to processmasters and ma
vHow To Read This ManualSymbolsIn this manual, the following symbols are used:R WARNING:This symbol indicates a potentially hazardous situation that m
OPERATION501❒If you set original in the option-al document feeder, originalsare fed and prints are complet-ed automatically.
All Class Mode—Making Variable Numbers Of Prints From The Same Original Using All Stored Data511All Class Mode—Making Variable Numbers Of Prints From
OPERATION521E Press the {{{{Start}}}} key.F Check the image position of thetrial or proof print.Note❒If the image position is not cor-rect, adjust it
Auto Class Mode— Making Variable Numbers Of Prints From The Same Original Using Stored Data531Auto Class Mode— Making Variable Numbers Of Prints From
OPERATION541C Press the [OK] key.D Select the desired classes for eachgrade.Selecting classes with the {~}, {}}, {|}, or {{} keyA Select the desired c
Auto Class Mode— Making Variable Numbers Of Prints From The Same Original Using Stored Data551key and press the [Cancel]key.❒Repeat steps A and B unti
OPERATION561Manual Class Mode With One Original—Making Variable Numbers Of Prints From The Same OriginalUse the {Class} key to make sets ofprints from
Manual Class Mode With One Original—Making Variable Numbers Of Prints From The Same Original571E Press the {{{{Enter}}}} key.F Enter the desired numbe
OPERATION581Manual Class Mode With 2 Or More Originals—Making Variable Numbers Of Prints From Different OriginalsPreparationTo use this function, you
Manual Class Mode With 2 Or More Originals—Making Variable Numbers Of Prints From Different Originals591E Press the {{{{Enter}}}} key.F Enter the desi
viMaking PrintsBefore making prints using this ma-chine, you have to make a master bypressing the {Start} key. When youpress the {Start} key, the mach
OPERATION601M Press the {{{{Print}}}} key.N After the first set is completed, setthe second original on the expo-sure glass (contact glass) andpress t
Class Mode—Making Fixed Numbers Of Prints From The same Original611Class Mode—Making Fixed Numbers Of Prints From The same OriginalUse the {Class} key
OPERATION621F With the Number keys, enter thenumber of sets you wish to make.Note❒Up to 99 sets can be selected foran original.G Press the [OK] key.H
Combine Originals—Combining Originals Into One Print631Combine Originals—Combining Originals Into One PrintYou can combine originals in two ways:❖❖❖❖2
OPERATION641❖❖❖❖Metric version❖❖❖❖Inch version❒The following tables list the combinations that can be used in 2 one-sidedoriginals → 1 one-sided print
Combine Originals—Combining Originals Into One Print651❖❖❖❖Inch version❒If the proper reproduction ratio is not selected, images might not completelya
OPERATION661Note❒To have the machine choose a suitable ratio automatically, use Auto Mag-nification Selection mode. See ⇒ P.32 “Auto Magnification Sel
Combine Originals—Combining Originals Into One Print671H The beeper sounds after the first original has been stored. Set the secondoriginal face down.
OPERATION681Auto Combine Mode—Having Images Repeated On One PrintPreparationTo use this function, you have toselect Auto Combine mode withthe user too
Auto Combine Mode—Having Images Repeated On One Print691E Select [Repeat 2] or [Repeat 4] withthe [←←←←], [→→→→], {{{{~~~~}}}}, or {{{{}}}}}}}} key.F
viikey. See ⇒ P.26 “Adjusting PrintImage Density”.D Enter the desired number ofprints with the Number keys.E Press the {{{{Print}}}} key.When the prin
OPERATION701Skip Feed PrintingIf the backs of prints are dirty, youcan increase the time between twoprints using the {Skip Feed} key. Bydefault, when
Skip Feed Printing711E Press the {{{{Start}}}} key.F Check the image position of thetrial or proof print.Note❒If the image position is not cor-rect, a
OPERATION721Program—Storing Your Print Settings In MemoryYou can store up to 9 frequently usedprint job settings in machine memoryand recall them for
Program—Storing Your Print Settings In Memory731Recalling A ProgramA Press the {{{{Program}}}} key.B Make sure that [Recall] is selected.C Press the [
OPERATION741D Select the program number youwant to protect with the [←←←←], [→→→→],{~}, or {{{{}}}}}}}} key.Note❒You can also select the programnumber
Security Mode—Printing Secret Documents751Security Mode—Printing Secret DocumentsThis function prevents others frommaking prints of secret documentsfr
OPERATION761Quality Start Mode— Regaining The Image Density When The Ink On The Drum DriesIf the machine is not used for a longperiod of time or you c
Job Separation—Separating Printing Sets On The Paper Delivery Tray771Job Separation—Separating Printing Sets On The Paper Delivery TrayThe print on th
OPERATION781A Press the {{{{Job Separator}}}} key.B Make your prints.Note❒After the last page of each printing set is fed out to the paper delivery tr
Saving Master791Saving MasterThe machine automatically changesthe master length depending on thepaper size you use. This saves bothmaster and ink.a =
Related products and manuals for Printers Savin 5450
 (54 pages)
(107 pages)
(96 pages)
(106 pages)
(80 pages)
(14 pages)
(167 pages)
(56 pages)
(30 pages)
(54 pages)
(107 pages)
(96 pages)
(106 pages)
(80 pages)
(14 pages)
(167 pages)
(56 pages)
(30 pages)
© 2020, manymanuals.com. All rights reserved. | 2.177 s |
 Manymanuals.com
 Manymanuals.de
 Manymanuals.fr
 Manymanuals.it
 Manymanuals.pl
 Manymanuals.cz
 Manymanuals.es
 Manymanuals-pt.com
Comments to this Manuals